My Very First Quilt

Hello!  It has been a long while since either Sara or I posted.  No real reason on my part other than the fact that it was nice to just sew and create without having to take pictures and sit down and write about it, but I have finally taken some photos of a few of my projects from the last few months and decided it was time to share.  My big project this summer was to sew my very first quilt.  When my friend Manpreet told me she was expecting her first baby I knew that I wanted to make her something special.  I had been thinking quilt and decided that is would be a good idea when she sent me a pin on pinterest linking to a pillow and quilt combo that she liked.  I think she was specifically asking if I could make her the pillow cover, but I ended up going for a quilt.  She didn’t know what she was having (she has since had an adorable little girl) so the nursery was going to be gender neutral with yellow, gray, and elephants.  We decided on this elephant print and then I just picked fabrics that were yellow and gray to work with her theme.

IMG_8315

I used the baby lattice quilt tutorial that I found on Moda Bakeshop.  It seemed like a good beginner quilt to me.  The squares and sashing pieces were easy to cut out and piecing it together was super straight forward.  It took me forever, but that was my own fault.  I found the process of piecing the quilt top to be super tedious and pretty boring so I never got very much done at each sitting and I would often find something else to work on when I knew I should be working on the quilt.  In fact I procrastinated it so much that I was finishing the quilting the night before the baby shower.

IMG_8310

All my rows don’t line up quite as perfectly as I would like, but for the my first attempt I am super happy with how the quilt turned out.  Initially I had some trouble with basting the quilt and on my first attempt at sewing a few of the quilting rows I ended up with some pretty big puckers.  That was extremely annoying to take out, but my second attempt worked out much better.

IMG_8309

I didn’t take a good picture of the back, but you can see the yellow polka dots peaking out.  I used this Riley Blake flannel for the back which adds a nice layer for coziness for a baby quilt.  I went with a natural batting so that it has that nice crinkly look now that it has been washed.

IMG_8314

To go along with the quilt I made a couple of elephant stuffies using this pattern and tutorial.  I was able to use my scraps to make them and I absolutely love how they turned out.  I especially love the little tail!  Plus the pattern was free so total winner in my books.

IMG_8317

Couldn’t be happier with how this whole project turned out.  Although I didn’t necessarily love the whole process of quilting I really loved the final result and would really like to make some quilts for my own kids at some point.  Plus now that I made baby 1 a quilt all future babies will also need their own quilt made with love from their Auntie Bitty!

Elizabeth

Pattern Testing: Raindrop Tee

I have been busy with a bunch of pattern testing recently, but as usual have not been sharing any of my finished projects so when the designer from my most recent test asked if any of us wanted to take part in a pattern tour I signed up knowing it would give me a deadline and make me actually complete a post.  I love sewing t-shirts for my kids and would probably say that I make more of them than anything else.  They are so quick to make and get a ton of wear so when I saw the pattern call for the Raindrop tee I couldn’t resist applying.

IMG_8235

The Raindrop tee by Gracious Threads is a slim fitting t-shirt with a high-low hem and two different sleeve options.  It also includes a pocket which can be made with either knit or woven fabric for a fun pop of colour or pattern, but obviously I skipped it for my version.

IMG_8246

The top comes together really quickly and Jess’s instructions are clear and easy to follow.  The 3/4 sleeves are perfect for the fall weather that will be coming our way soon and the slim fit should make it easy to layer with a sweater which should give us some good use from the top.

IMG_8250

This striped version was actually my second top and I changed up how I put in my neck binding and didn’t really think it through completely which means the neckline is a bit wider than I would like for this one.  Totally my error and the neckline is not wide on my first version when I followed the direction exactly.

IMG_8222

See, much nicer neckline on this one!

This pattern is a winner and if you want to purchase it for yourself you can do so here or here.  Or you can enter the giveway to win your own copy!

a Rafflecopter giveaway

Portside Travel Set

Since I finally put the finishing touches on my husband’s Christmas present (only took me til the middle of January) and I can share it with you all.  I initially hand stitched the lining too close to the zipper and it kept getting caught so I took that out and redid it and now it can be used!  Sara and I purchased the Portside travel set from Grainline Studio when it first came out, but neither of us got around to touching it until it came time for Christmas presents.  Sara made a couple of the dopp kits for a few of her friends and I decided to make the whole set for my husband.  Every time we go somewhere that doesn’t require a lot of packing we pull out an old duffle bag that is falling apart and he has mentioned more than once that we should replace it, so this seemed like a perfect fit.

IMG_7273

IMG_7296

For all 3 pieces I used twill for the outer and a quilting cotton for the lining.  The black twill is quite a bit thicker than the blue and makes for a floppy bag.  If I make this bag again I will definitely pay more attention to the fabric thickness and use something that will hold its shape better.  Another change I will make with this bag if I make it again will be to add a pocket or two to the inside of the bag to make it a bit easier to keep some of the smaller items organized.

IMG_7269

This was my first foray into bag making and there were parts that I found a bit confusing and challenging.  The duffle bag came together fairly easily although it started with some confusion when I could not find the marking for lining up the webbing.  Easy enough to figure out though.  The only other part of the bag I found confusing was attaching the bottom, especially around the corners, but thankfully Sara came to the rescue and sent me some pictures from her dopp bag that made it a lot easier for me to understand what to do.

IMG_7271

IMG_7272

Sara also came to the rescue when it came to sourcing and purchasing the hardware and webbing for me.  I live about 45 minutes outside of Vancouver so could have found it if I trekked into the city, but Sara has a store close to her so she was kind enough to pick it up and mail it to me.

IMG_7279

IMG_7280

The dopp kit is the piece that caused me the most frustration.  Trying to attach the top of the bag to the sides was torture and no amount of stretching and clipping the curve let me get a nice clean finish.  There are a few puckers that drive me nuts, but otherwise I am pretty happy with the final product.

IMG_7284

The only change I made to the dopp kit was to add a lining to the outer pocket so there was no exposed zipper.

IMG_7282

The zipper pouch took almost no time to complete and should come in handy for odds and ends when packing.

IMG_7292

My husband was kind enough to let me take a few photos with him in them.  This helps give some perspective to just how big this bag really is.  Much bigger than I was expecting, but will make it super useful.

IMG_7294 IMG_7288

Although there were a few hiccups along the way, which I will attribute to inexperience, I am super happy with the final look of all 3 pieces and think it will make a great gift for others in the future.

Elizabeth

2013 Round-up!

I think that I may be the very last to Gillian’s Top 5  party but I was largely avoiding the internet over the holidays (a mixture of business, travel and a dying phone).  And I needed to think about it! Now that I have given this some thought, I have a feeling this is going to be a long one… so brace yourselves!

11384379103_a621f96522

Before we get into my me-made hits and misses of the year, I’m going to start with the people as this was by far the best part of the last year. Bitty and I started this blog nine months ago now and I have to say that it has been a blast! I can’t even remember what our motivation was for starting it (meeting like-minded individuals…?) but I will say that it has been a genuine pleasure to get to know my little sister again through it.  I’ve lived far away from most of my family for over a decade now and we’ve lost touch. Guess that’s life and it happens to all of us but there is no denying that it sucks! I still have high hopes that Bitty and I can convince (sucker) other family members to come and post some of their crafty endeavours.  Our mom is the original fibre goddess who loves to crochet and knit.  When we were kids she also made a lot of our clothing and if I were anywhere near Vancouver right now I would astound you all with a picture of the eldest three Hamilton Chicklets in some amazing matching polyester jumpsuits. Amazing, I tell you! Alas, you’re just going to have to take my word for it… for now! And our older sister Kelley used to be a fantastic sewist that now paints these giant murals for her kids and their friends. Wish I had such talent! My brother Chris cooks and dabbles in woodworking… in the same obsessive way we all dabble in sewing and knitting! He has a couple of really beautiful pieces in his house and is apparently now making a guitar.  And our youngest brother sometimes knits, which is just awesome!

sewing meetup lunch web

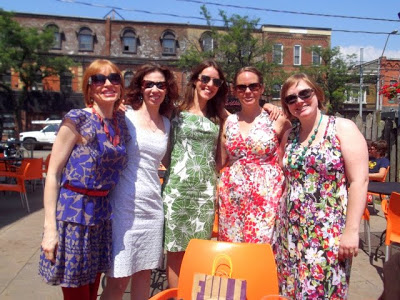
Catja, Andrea, Clare, me and Gillian (photo totally stolen from Andrea’s blog… see below for a link to her meet-up blog post)

Moving on to my new blogging friends! So.Much.Fun!!! In the past several months I have met the most amazing group of fellow sewing and knitting enthusiasts! It started in August when Clare was stopping in Toronto to meet her twitter peeps (Gillian, Catja and Andrea).  They graciously let me (a stranger at the time) crash the party and it was such a blast! Fabric shopping and tequila really is a winning combination! Andrea posted about our afternoon here. Clare was visiting Ontario at Christmas so we all met up again and it really felt like I was catching up with old friends at this point (Clare posted about our shenanigans here)! Since my initial sewing meet-up in August, it has been a blur of meet-ups in Toronto, Guelph, Hamilton and Kitchener-Waterloo where I got to meet Leila while she was visiting Gillian, Andrea, Kristin, Chloe and many others! 

20131219_225109

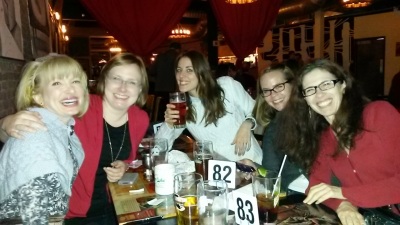
Christmas visit! Catja, Gillian, Clare, me and Andrea

As an added bonus, Kristin, Andrea and I share a LYS (EweKnit) and live within blocks of each other so our meet-ups are becoming a fairly regular event (see Kristin’s post here about one of our first knitting meet-ups). Did I mention the fun?! And this does not even begin to cover all of the people I have met online! Gail, for example? Between blog comments, instagram and Andrea, I feel like I’ve met her already and found myself initially adding her name to the list of people I met IRL this year! Anyway, I hope I get to meet more of you in 2014 (NYC meet-up this Spring? Hope so!). OK. Enough sap. On to some actual sewing and knitting!

photo 3

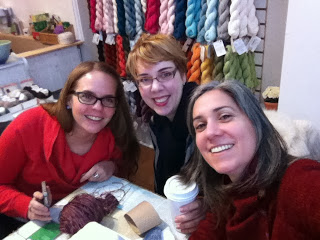
Me, Kristin and Andrea at EweKnit. Photo courtesy of Kristin!

To keep it easy, I’m going to stick with the ones that I have actually blogged about and have some photos of! Sadly, that omits the vast majority of the things that I have knit or sewn in the last year.

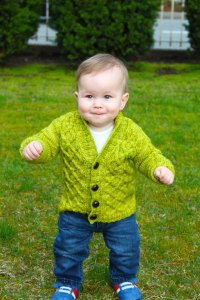
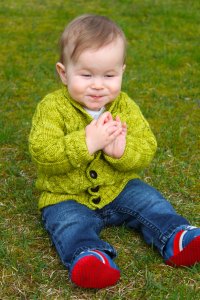
My all time favourite make is easy! Though I technically made this in the last two weeks of 2012, it didn’t debut on this blog until 2013 so I say it counts! This would be the Gramps cardigan! Clearly not made for me… I made this for my nephew Dax for Christmas and I still love it! The yarn, the colour (Grasshopper!), an adorable little boy dressed as an old man.  Dunno why but this is still one of my all time favourite makes!

Dax standing 15 (medium)Dax clapping 22

The rest of my favourites are in no particular order.

day anna side cn tower

There is my Anna dress. Probably a fairly obvious pick. While I seem to keep making dresses, I’m generally not a huge fan of actually wearing dresses.  Silly, I know!  I just find them so impractical! Winters in Toronto are not exactly an ideal time for them as even if you’ve got some nifty wool tights to keep you warm, the constant wind downtown will not be your friend! Anyway, I digress. A silk Anna dress is not for every day wear but for those special events, this one is a real winner! So lovely to wear with the silk lining and a simple and flattering style. Love it! Definitely a hit in my books!

miette

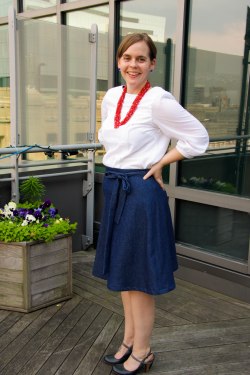
Then there is the Mathilde blouse that I made for Project Sewn. This white poplin version was only meant to be a muslin and it is a wee short for my liking but I wear it all of the time.  A total win in my books.  I have fabric set aside for a couple more versions so I should really get my shit together and make more!

with sweater LR

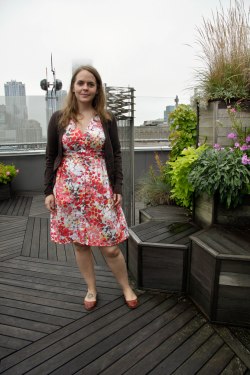
My Darling Ranges dress. For a self-proclaimed dress hater, I’m a wee amused that two of my favourite makes are dresses! I won’t admit to wearing this often but I do still love it. Maybe because I made it at the cottage and every time I see it or wear it, I’m reminded of good times and excellent friends?  Besides, how can you not smile when you wear such happy fabric! 

Renfrew cowl

And finally, there is the Renfrew. This version is one of several that I have made and these suckers easily get the most wear. They’re just so easy! So far I have only made the cowl version but I’ll get around to the other soon enough!

This post is already epic so I am going to save the misses for another post.  You may not see it for awhile as I tend to procrastinate on such things.  Besides, its time for Project Run & Play so Bitty’s turn on the blog!

Sara

PR&P – High Low Tunic

Project Run and Play time again!  This was the very first sew-along that I participated in last spring so I’m so excited to be sewing along again.  This week was the pattern remix challenge and my first attempt at making more than simple changes to a pattern.  The challenge was to remix Oliver + S’s free pattern, the Popover Sundress.  Although the dress is simple and sweet, it is September and time to start thinking about sewing for fall.

IMG_6477

I decided to turn the dress into a tunic with a high low hem that was inspired by Megan Nielsen’s Briar shirt pattern.  My favourite part of the original sundress pattern was the contrast yoke so I knew I wanted to keep that and make it even more pronounced by both raising and extending it.  I made the bottom of the yoke curved to follow the shape of the hem, with the front being concave and the back being convex.  The yoke is lined and has a slit with button and loop to let it fit over Finnley’s head.

IMG_6459 IMG_6458

I love adding pockets to everything I make for Finnley but I usually add inseam pockets, which she never uses.  The original pattern had tiny little patch pockets so I stuck with that idea but made them much larger and extended them all the way to the hem of the tunic.  Keeping with the curves I made the bottom of the pockets follow the curve of the hem.  Thankfully Finnley loves these pockets and it was difficult to get pictures without her hands in them!

IMG_6478

These are the faces I kept getting when I would ask her to take those hands out of her pockets!  Little lady doesn’t like being told what to do!

Hopefully this tunic will transition well into the fall with a cardigan over top or even a long sleeve shirt underneath.

Elizabeth

Linking up with: Feather’s Flight // The Train to Crazy // We Did It Wednesday Sew Much Ado// Too Cute Tuesday // Ginger Jamboree

KCW: Little Man Shorts

Finally finding some time to share my last two projects from this round of KCW, a couple pairs of shorts for Daxton. They have been finished for a few nights but I still had to grab some pictures of the final pair and we ran outside quickly after dinner tonight to snap a few.

IMG_6133 IMG_6161

To make these shorts I used Dana’s new shorts pattern and made the flat front version with the addition of the pockets.  Both versions are made using some bottom weight fabric I bought from Joanns on my last trip across the border.  Dax was in desperate need of some neutral shorts that would go with anything so we went with some khaki and gray.

IMG_6130

The shorts came together really quickly and the fit is pretty good.  I  made size 18 months for my little man and the waist is a little bit loose but the length is perfect.  The pockets are completely unnecessary since Dax has not discovered pockets and their storage possibilities yet, but they add a nice little detail.

There is not a lot to say about these shorts besides how much I love them, so I will just add some actions shots of my little man since anything else is next to impossible to capture!

IMG_6150

IMG_6145

IMG_6128

IMG_6141

Elizabeth

KCW: Pink Ombre Ruffle Skirt

Can’t believe how quickly it arrived, but it is time for KCW, the summer edition.  I wasn’t sure if I was going to participate this time around, considering it is already the middle of July and I thought my kids would have all the summer clothes they needed by now.  WRONG, the master procastinator/ horrible time manager strikes again!  So, summer basics it is!  Most of my planned projects (if I manage to fit them all in) are shorts for the kids, but this first one is actually a present for Finnley’s BFF Annabelle.  Annabelle just turned 3 it is going through a major princess faze.  She lives in dresses, and only dresses that she deems princess worthy.  Not sure this skirt fits the bill, but I am hoping pink and ruffles will win this little girl over!

IMG_6055

Finnley modelling the skirt

Loving this sweet little skirt!  Thinking I need to see if I have enough fabric to make one for Finnley!  Originally I envisioned pink ombre using voile so the final skirt would be more floaty and a little bit less stiff, but the only fabric that I could find in 3 shades of pink was quilting cotton solids.  Would like to try it with voile in the future but I am still pretty happy with how it turned out.  I used this tutorial to help me figure out measurements and it came together really quickly.

IMG_6072

The one change I will probably make next time is I will make the ruffle layers a little bit longer.  I don’t love how you can see the connector pieces and wish that the ruffles overlapped slightly.

IMG_6064 IMG_6061

Hopefully I will have some shorts for my little man to show in the next day or two!

Elizabeth

Linked here:
The Train to Crazy

Hawthorn Peplum

Once again we have been silent for far too long! Although I have been sewing I don’t have many finished projects, just a pile of fabric and a list of projects that both just keep on growing. But I finally have a finished project to share using Colette Patterns lovely new pattern, Hawthorn.

IMG_6025

There is currently a sew-along going on for the Hawthorn, but I got a bit excited!  For my first time with this pattern I decided to try version 1, the peplum, although I do have plans to get started on the sleeveless dress for the sew-along soon I hope.  This pattern was the most complicated garment I have attempted to sew so far, but the directions were extremely easy to follow and it came together easier than I expected.  There are definitely some flaws but overall I am happy with final result.

Although it came together relatively easily I did have to make a few changes.  When I made a quick muslin of the bodice I was pretty happy with the fit and didn’t make any changes to the pattern.  Once I actually sewed everything together I wasn’t crazy about the sleeves or the fit around the waist.

photo(5) IMG_6038.

To solve these issues I ended up taking in the sides to make the shirt more fitted and I changed the way the sleeves were finished.  Originally the sleeves were very loose so I removed the bias tape and shortened it by quickly wrapping it around my arm to get a feel for how I would like it to fit.  I then gathered the sleeve and sewed the bias tape back on.

IMG_6041 IMG_6044

Much happier with the result and glad I took the time to make the change.  Actually understanding what changes to make to get my desired fit is definitely a work in progress and I am not 100% happy with how it looks from behind.  There seems to be a bit of extra fabric that bulges out a bit and hopefully I can figure out how to fix that for my dress.

IMG_6040Hopefully one of us will be back later this week with another finished project to share!

Elizabeth

Linked up:
125
Photobucket

Appliqued Bike Skirt

After what feels like forever I finally have a new project to share!  A bike skirt for Finnley!

IMG_5904

This skirt ended up being a VERY time consuming project but it ended up being pretty adorable.  My initial inspiration came from this skirt, although I took mine in a different direction and used a super bright colour palette.  To make the actual skirt I used Dana`s simple skirt tutorial and appliqued bikes around the bottom of the skirt.

IMG_5894

To make the applique I had my much more artistic husband free hand a stencil for me which I then painstakingly cut out of pink, orange, and lime green broadcloth.  I then sewed around the bikes carefully, but please don`t look too carefully at my less than perfect stitches!

IMG_5868 IMG_5883

Pretty happy with how it turned out, but will try a much simpler applique next time!

Elizabeth

Linked up at

Photobucket